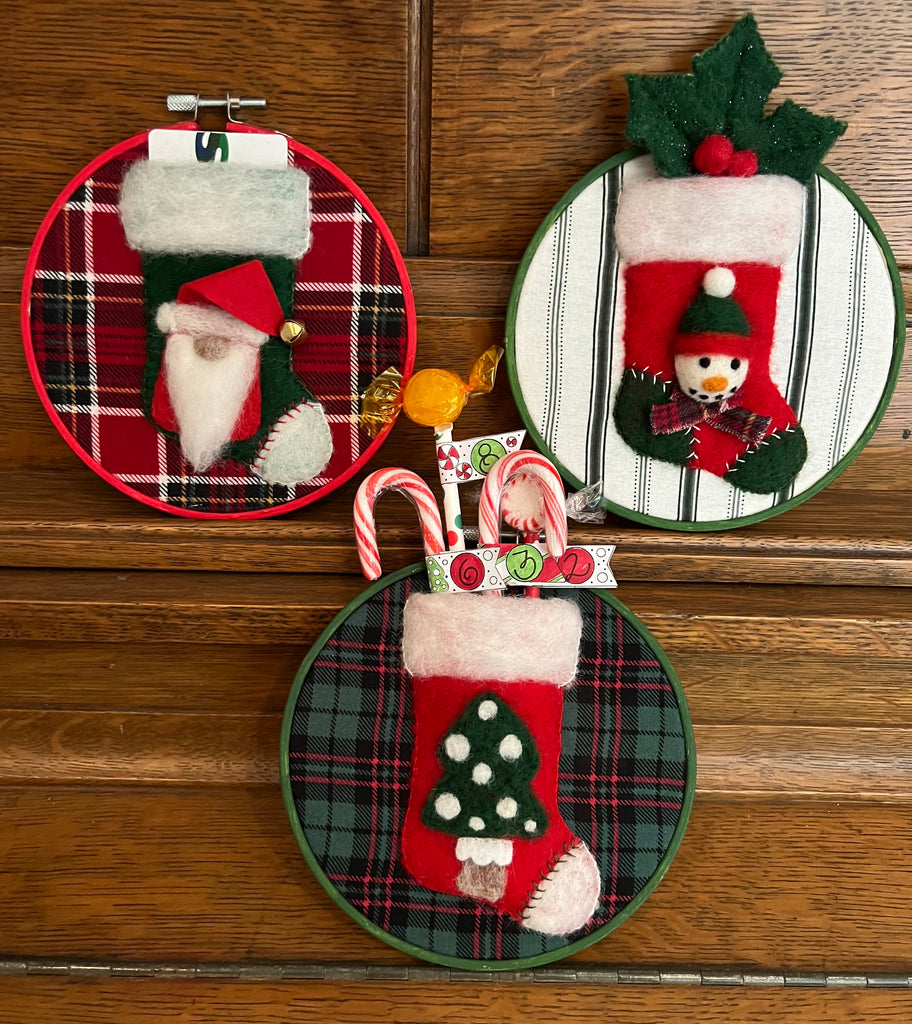
As Autumn comes to an end, it’s time to get crafting for Christmas! The Crafty Kit Company has a very special blog featuring this clever felted Christmas Stocking with either a Christmas Tree, Santa Gnome or Snowman. They can double as a gift!
The stocking is a pocket that is stitched on fabric (you can upcycle shirts or pyjama bottoms). The stocking ‘pocket’ can hold a gift card, money, small gift or even a holly pick!
Wait! Don’t stop there - you can also create an Advent Countdown with candy canes and sweeties.
CKC is offering a Christmas Stocking Surprise pack for £4.95 to get you started!

Click here to download Christmas Stocking Surprise Hoop and Advent Countdown template!

SUPPLIES
Order the Christmas Stocking Surprise pack for most of the materials Just £4.95! (*included in pack)
FELTING WOOL
Very small amounts of:
FELT FABRIC
- 1 x 20mm Felt ball*
- 15cm Bamboo Embroidery Hoop
- Eco-Friendly Felting Mat: Medium
- Clover Pink ‘Pen Style” Needle Felting Tool
- Felting needle
- Holly pick*
OTHER SUPPLIES
- 8” square of fabric or upcycled shirts and pyjama bottoms
- Marker
- Red, White and Green embroidery threads and needle
- Scissors
- Tape
- Ball-head pins
- Red or green acrylic paint, brush (optional)
- Paper Christmas straws
- Candy Canes and sweeties
- 2” wire ribbon
DIRECTIONS FOR CHRISTMAS STOCKING SURPRISE HOOP
Print the template and cut out the Christmas Stocking, Snowman, Christmas Tree Skirt and Santa Gnome Patterns. Cut out Stocking heel, Stocking Toe, Christmas Tree and Santa Gnome’s Fur Hat Trim Paper stencils. Set aside.

Ana’s Crafty Tip: to keep your felting pad(s) clean, cut a piece of white felt fabric a little smaller than your felting pad. Put the white felt fabric on top of your pad and secure with pins in the four corners. When it gets a bit messy remove and add a new topper.


Trace the Christmas Stocking Pattern on the red felt fabric or use the freezer paper method. Repeat on the holly felt fabric. Cut out.

With a marker and ruler draw a straight line on the stocking (see pattern). Pin Paper Stencil stocking heel and toe in place.


Felt white wool within the paper heel and toe Paper Stencils. Remove Paper Stencils. Felt the cuff of the stocking.

Turn over stocking and trim off excess wool.


Felt scarlet wool over remaining area of stocking.


Turn over stocking and pull wool from the front over the back edges. Felt. This will give a nice clean edge.


With embroidery thread, stitch as shown on the edge of the top and heel of the stocking. This gives the stocking a nice finished look.
PICK YOUR FAVOURITE DECORATION TO FELT ON YOUR STOCKING (Or do all three!)
The following directions will show you the steps for the three stocking decorations.
CHRISTMAS TREE


Pin the Christmas tree Paper Stencil over the front of the stocking as shown.
Felt forest wool within the stencil of the tree, felt fawn for the stem. Remove Paper Stencil.

Cut out the Christmas tree skirt from the white felt fabric. Felt the edge of the skirt at the top of the stem, under the tree.


With white wool, felt dots on tree. The Christmas Tree is done.
Follow directions further down on how to put the Christmas Tree Stocking on the fabric and hoop.
SANTA GNOME

Trace Santa Gnome’s Pattern on red felt. Cut out. With a marker and ruler, draw two straight lines on the gnome’s body (see pattern).


Pin Santa Gnome’s felt as shown. Felt up to the first line to secure it to the green stocking.


Pin Paper Stencil lining it up on the two marker lines. Felt white wool within the Paper Stencil.
Remove Paper Stencil (you may want to felt the edges).


To create the beard, take a piece of white wool about the length of the gnome. Gently twist the ends. Place it as shown. Felt acrost the center right along the edge of the fur on the hat.
Fold over the beard from the top over the beard on the body. Twist the two ends together to create the beard.


To create the gnome’s nose, fold a piece of fawn wool in half, roll it and felt it until you get a nose shape. Felt the nose over the beard, under the fur in the center. Take the tip of the hat and fold it to the left, pin in place.


Roll a piece of white wool and felt it to create a ball. Felt the ball to the edge of the stocking.
Follow directions further down on how to put the Santa Gnome Stocking on fabric and hoop.
SNOWMAN

Trace the Snowman pattern on to white felt, cut.
With a craft knife, carefully cut the 20mm ball in half.
Place half of the ball on the white felt.


To make the snowman scarf, cut or tear a piece of fabric 8cm. Fold it as shown in photo felt it in place.


On the stocking, felt the head and felt background over the edge of the scarf. The white felt that is showing is going to be the snowman’s hat. Felt the forest wool over the white felt fabric slightly overlapping the half ball as shown in photo. Roll a sausage strip of scarlet wool, felt it overlapping the hat and head. Felt a white ball for the top of the hat.


To create the snowman’s face, you will need to felt a small marigold nose and from raven wool, roll two eyes and five small balls for his mouth. Felt in place as shown in photo.
Follow the directions below on how to put Snowman Stocking on fabric and hoop.
FABRIC HOOPS

Undo hoops and paint the outside of the hoop. This is optional but it gives the finished hoop a nice look. Cut out 3 pieces of fabric 8” by 8” (I chose flannel plaids). You can use anything you like even to cut up an old shirt!

Put fabric in hoops. Be sure to put them tight. Pin each stocking on a hoop.


You can do any stitch you want. I found that I liked the look of the Blanket Stitch the best.
If you are not sure how to do a Blanket Stitch, just follow the sequence in the photo above.
MOST IMPORTANT DO NOT STITCH THE TOP OF THE STOCKING CLOSED!!

To finish the hoop, cut the fabric in a circle (basically you are cutting off the corners). Then do a running stitch around the edge.

Turn over the hoop and pull the threads tight, tie off. Cut a piece of felt fabric and whip stitch it to the back gathered fabric. Or you can hot glue the fabric and the felt fabric backing.

Ana’s Notes:
You did it! I do love this pocket idea!
You don’t have to do all three. Pick the one(s) you like the best. Or if you want to personalise it, embroider an initial in the center of the stocking instead of a decoration!
What I really like about this design is it is easy to do and a great gift for someone on your list who is hard to shop for. And the best part is, they will have a special gift you made them that they can use year after year.
If you are brave, you can make the Advent Countdown that follows. However, you need six hoops. Be sure to post your finished Christmas Stocking Surprise on Craft Your Way To Happiness on Facebook and let us know what you are putting in your stocking(s).
Happy Christmas!
XO Ana
Christmas Stocking Surprise Advent Count Down Hoops


First, you need to do six hoops with stockings. You might be able to get away with five hoops but the sweets might be a bit tight in the stocking.

Print off the tags. Colour then cut out the tags, sit aside.

Follow the photograph above on how to cut the paper straws to prepare them for the sweeties. Once they are cut flatten the piece of straw sticking up. Place the sweetie on the flat part and tape from the back.

With a glue stick, glue the back of the tag. Wrap around the straw, matching the “V” ends, press together. Do the same technique on the candy canes.


Once you have 12 straws and 12 candy canes you are ready to put them into the stocking hoops: but first string your hoops together with a 2” piece of wired ribbon. See photo below.
Note: when I put the sweetie straws and candy canes in the stockings, I mixed up the numbers
Leave a comment