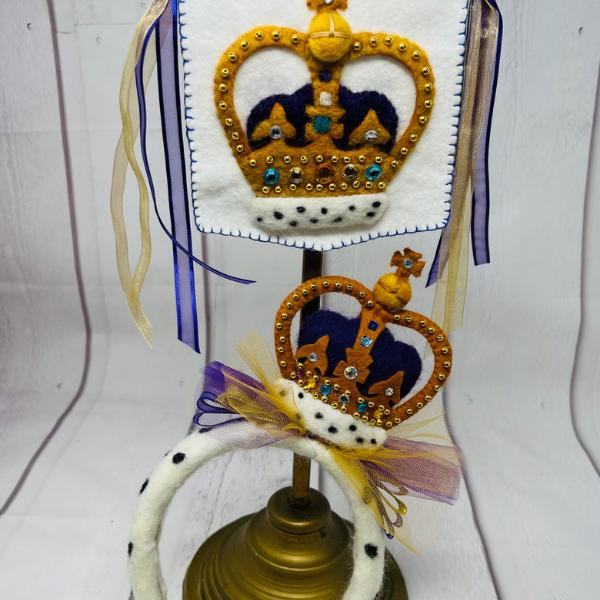
Kat’s Coronation Crown & Bunting

Supply List
Click on the red text to take you to the specific product pages!
These supplies are available from The Crafty Kit Company.
Felting Wool
You can order these four colours in Pick 'n' Mix.
Felting Fabric
Clover Needle Felting Mat (Large)
Adhesive: Fabric, Craft & General Use Glue
Other Supplies
- Freezer Paper
- Embroidery needle
- Embroidery Thread: sand/gold, purple, white
- 4mm gold beads
- Gems and or sequins
- Ribbon: gold and purple
- Wooden dowl or bamboo skewer
- Scissors
- Sewing pins
- Craft knife
- Iron
Kat's Coronation Crown & Bunting
1. Cut felt fabric slightly lager than the patterns. Mix the ginger pup and the marigold together.

2. Using the multi tool, felt the wool to cover the entire piece of sand felt fabric. Repeat this method; amethyst wool over purple felt fabric, white wool over white felt fabric.
For best results, felt over the mat/brush. Trim off excess wool form backs of felt fabric.

BEST TIP: If you have not discovered using freezer paper for crafting you are in for the best tip ever! Trace your pattern pieces on the paper side of the freezer paper (see photo). Place the coated side of the freezer paper on the back of the felted fabric. With hot iron, iron the paper side of the freezer paper. This will only take a couple of seconds melting the coated side to stick to the felt fabric.

3. Once your pattern pieces are attached, cut them out. Peel off the freezer paper.
Note: The save the freezer paper cutout patterns because they can be reused again!!!
If you cut felt out a lot, this method will be a game changer for you!

4. Cut out the Kat’s Coronation Crown Bunting from white felt fabric.
Fold over the edge as shown on the pattern. Pin in place, sew a whip stitch with white floss to create the casing.

5. Pin the crown frame B in the center of the bunting. Pin the cap of maintenance in the center of frame. Whip stitch with coordinating floss colours.

6. Pin the crown frame A over the cap of maintenance and the crown frame B, whip stitch in place.

7. Place the cap of maintenance fur trim over the bottom of the crown frame A and B. You may want to add more white wool. You can either stitch it in place or felt it in place. With bits of raven wool felt the ermine spots.

8. Stitch the gold beads to the crown frame (go through the back of the bunting).

9. Cut the 15mm wool ball in half, felt the crown wool mixture over the ball half. Stitch the half ball as shown using all 6 strands of floss.

10. Glue gems on crown or felt them.

11. Blanket stitch around the outside edge of the bunting.
To make the banner, cut a wood dowl or bamboo skewer a little longer than the bunting (optional painting). Push through the casing, tie thread to hang. Tie on ribbons to hang down on both sides.
Designer Notes:
If you don’t want to do all the stitching, you can glue everything down. If you want to us this for bunting put ribbon or cording though casing.
Kat's Coronation Fascinator


Supplies are the same as the Coronation Crown
Additional Supplies
- Pipe Cleaner
- Glue Gun
- Headband
-
Tulle: Gold & Purple

1. Cut two Fascinator Crown Frames and topper form sand felt fabric (use the freezer paper method).
You will not be felting wool felting this piece; however, you will be felting wool felt on the Cap of Maintenance (both pieces) and the maintenance fur.

2. Blanket stitch the two crown frames outside and inside of the edges (do not stitch the center or fleur de lis) leavening the bottom open. Note the extra stitch line on the frame. This will create a casing.

3. Fold over one end of the pipe cleaner and cover with tape. Push it through the frame casing.
This can be a little tricky; but it works. Cut off excess pipe cleaner.

4. Blanket stich the cap of maintenance back-to-back. Leave bottom open.

5. Push the cap of maintenance through the bottom of the crown frame. Lightly stuff with extra wool.

6. Pin maintenance fur in on front and back of crown frame. Whip stitch in place (leave open at bottom). Note: Felt fur and ermine spots like on Coronation Crown & Bunting.

7. Felt ginger pup and marigold mixture over wool ball. Fold top cross in half and stitch to top of ball. With 6 strands of floss stitch ball details. Stitch the ball on top of the crown.

8. Stitch the cap of maintenance to crown frame. Now stitch the crown base to the edge of the crown frame.

9. Stitch the gold beads to the crown frame on both sides. Glue gems and or sequins to the crown.
PREPARE THE HEADBAND:

10. Measure the headband, add 1-2 cm more. Cut out a piece of felt fabric. Felt with white wool, covering one side. Trim off excess wool on the back.
Felt ermine spots all over the white wool felted felt fabric.
Note: The headband colour does not matter. It can be padded or not.

11. Hot glue fur to the headband (make sure the headband is in the center of the fur. Hot glue the edge of the fur and attach to the inside of the headband.

12. Final touches to the head band: gather tulle, stitch in center and the same with the ribbon.
Hot glue tulle and ribbons slightly off center. Glue the crown to the top!
Now you are ready for the royal coronation!!!

Leave a comment